Diving into the vibrant underwater world, you’ll find corals, the rainforests of the sea.
But can you tell them apart?
Identifying coral is not just fascinating; it’s crucial for understanding and protecting marine ecosystems.
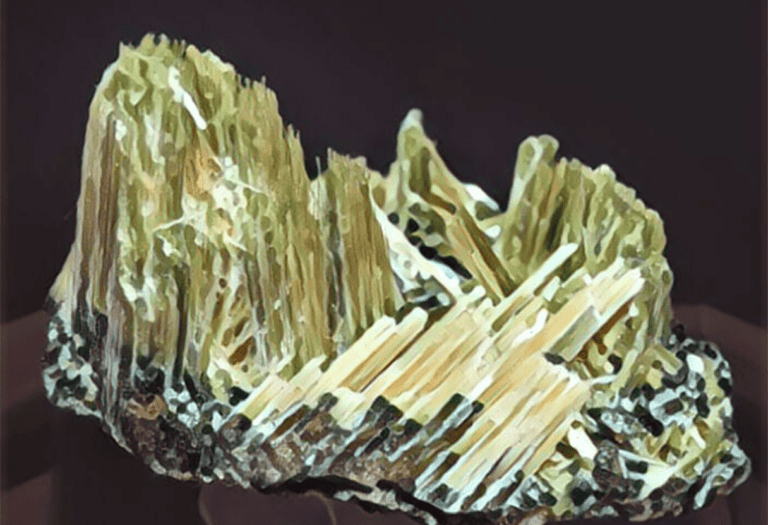
To identify real coral, examine its structure for natural patterns and calcareous texture. Genuine coral often shows unique branch-like formations, a matte finish when unpolished, and may have slight imperfections or variations in color, indicative of its organic origin.
How to Identify Coral Through Testing
When you’re determined to identify corals accurately, a number of tests can be utilized to reveal the true nature of your specimens. Whether you’re a hobbyist or a professional, understanding how these tests work will equip you with the knowledge to classify corals correctly.
Visual Inspection
Start by observing the physical characteristics of your coral sample. Color, texture, and shape can all give clues. Living corals typically display a wide range of vibrant hues due to the symbiotic algae living within their structures. In contrast, fossilized or dry corals tend to have more muted colors. Look out for the distinctive coral polyps and skeletal patterns which are strong indicators of a true coral.
The Streak Test
The streak test helps determine the true color of your coral by rubbing it across an unglazed porcelain tile known as a streak plate. The powder streak left behind can indicate the coral’s identity. Since true corals are soft and calcareous, they often leave a white streak.
Magnet Test
Performing the magnet test is straightforward—bring a magnet close to your coral. Corals consist primarily of calcium carbonate and should not be magnetic. If your sample is attracted to the magnet, it’s likely that you’re dealing with another mineral.
Hardness Test
Use the Mohs scale of mineral hardness to test your coral. Corals range in hardness but generally fall between 3 and 4 on the scale. You can test this by attempting to scratch your sample with a coin or a fingernail to assess its hardness.
Birefringence Test
Birefringence is a property where a material refracts light at two different velocities. To test this, you’ll need a polariscope. When placed between polarizing filters, corals will exhibit two distinct rays of light, revealing their calcite structure.
Checking The Diaphaneity
Diaphaneity refers to a coral’s translucency or opacity. By holding your sample up to a light source, you can assess if light passes through or not. Transparent corals are rare, while translucency is more common, especially in younger corals.
Single or Double Refraction
Using a dichroscope, shine a light through the coral and observe the exit point. Corals, being bi-refringent, will show two colors due to double refraction. These colors can help in identifying the type of coral you’re examining.
Refractive Index Test
The refractive index of a coral can differentiate it from other substances. This requires a refractometer to measure how light bends as it passes through the coral. Genuine corals have a refractive index typically between 1.486 and 1.658.
Finding The Specific Gravity
Specific gravity testing involves measuring the weight of your sample in air versus water. This reveals the density, which for corals, usually ranges from 2.60 to 2.70. You can use a hydrostatic balance or electronic scale for precise measurements.
Identifying Corals in the Field
Out in the field, equip yourself with a good guidebook that includes photos and detailed descriptions. It’s important to observe the surrounding environment, since corals are usually found in shallow, warm waters. Note the presence of symbiotic species like clownfish or shrimp, which can also indicate the presence of coral.
Recognizing Potential Coral Rocks
When looking for potential coral rocks, check for common characteristics such as a honeycomb pattern or branching structures. Many fossilized corals retain these patterns, making it easier to pick them out from other rocks.
Understanding these tests and observations provides a robust framework for identifying a diverse range of corals. As you venture further in your exploration, remember that the marine realm is a treasure trove of biodiversity, and each piece of coral has a unique story to tell.
Physical Characteristics of Coral
When you’re out in the field trying to identify corals, knowing their physical traits is key. Corals are incredibly diverse, but there are common features that you should look for. Typically, corals have a hard calcareous skeleton, which is their most identifiable feature. This skeleton is composed primarily of calcium carbonate, giving corals their signature rigidity and structure.
Colors can range widely among corals, from vivid blues and purples to subtle browns and greens. The coloration depends on the algae, known as zooxanthellae, living in their tissues. Polyp size and shape are also distinguishing characteristics with some corals displaying large, fleshy polyps, while others have small, almost inconspicuous ones.
Remember to take a closer look at the arrangement of the polyps. Some corals exhibit a branching pattern, others grow in massive boulder-like structures, and some even spread like a thin crust over the substrate. This structural diversity is not just aesthetic; it plays a significant role in the survival and function of coral colonies in their respective ecosystems.
In addition, pay attention to the texture of the coral surface. A smooth appearance may point towards different coral species compared to rough or spiky surfaces. The variety you may encounter is vast, and each trait is a clue to unlock the identity of the coral species before you.
How Are Coral Formed?
When you’re out exploring the marine world, it’s fascinating to unravel the origins of the vibrant corals you’re trying to identify. Corals are formed by tiny marine animals known as coral polyps. These minuscule creatures relate closely to sea anemones and jellyfish.
Polyps have a simplistic life process that contributes significantly to coral formation. They latch onto rocks or the sea floor and establish colonies that grow over time. Calcium carbonate is secreted by these polyps, forming a hard, protective limestone skeleton known as a calicle, which serves as the structural base of coral reefs.
Over time, new polyps attach to the skeletons of their predecessors, and the process repeats, creating the large, communal structures that compose coral reefs. These reefs are among the most diverse and biologically complex ecosystems on earth.
Factors such as water temperature, salinity, turbidity, and nutrient availability in the surrounding environment play a critical role in coral development. Optimal conditions for coral growth occur in shallow, warm waters like those found in the tropics. Here, symbiotic relationships with algae called zooxanthellae are essential for vibrant coloration and health.
Understanding how corals form will give you a better grasp of their biological and physical characteristics, enhancing your ability to identify the diverse types of corals on your next underwater adventure.
Preparation for Coral Hunting
Before you venture out to identify various corals in their natural habitats, it’s paramount that you’re well-prepared for the task at hand. Proper preparation not only makes the process smoother but also ensures that you collect accurate information while remaining safe.
Gathering the Right Tools
To start off, you’ll need a collection of tools that can assist you in examining and handling corals. Here’s a rundown of essential items to include in your toolkit:
- Waterproof notebook and pencil: For recording observations and findings without them being ruined by water.
- Hand lens: To magnify details on the coral surface for a closer inspection.
- Streak plate: For conducting streak tests which can help determine the mineral content of corals.
- Gloves: To protect your hands from sharp edges and potentially harmful organisms.
- Ruler or calipers: To measure the size and growth patterns of corals.
- Sample containers: Ideally transparent and sealable, for storing small coral samples.
- Dive gear or waders (depending on location): To ensure you’re able to safely reach and explore coral habitats.
Remember, it’s equally important to familiarize yourself with each tool and its proper usage to maximize its effectiveness during your exploration.
Safety Considerations
When embarking on a coral hunting expedition, your safety should always take precedence. Here are key safety tips to keep in mind:
- Understand local wildlife: Be aware of potential hazards in the coral environment, such as venomous fish or jellyfish.
- Check weather and water conditions: Ensure that conditions are safe for exploration to avoid being caught in dangerous situations.
- Wear appropriate clothing: Depending on the environment, ensure you have the right protective gear, like wetsuits or sun protection.
- Stay hydrated: Bring enough water, especially if you’re venturing into warm, tropical climates.
- Have a first aid kit: In case of cuts or stings, it’s necessary to treat injuries promptly.
- Never go alone: Always have at least one companion with you in case of emergencies.
By taking these precautions, you can minimize risks and focus on the task of identifying corals accurately and efficiently. When you’re well-prepared with the right tools and safety measures in place, you’re set to delve into the fascinating world of corals with confidence and peace of mind.
Handling and Care of Found Coral

When you’re out in the field, identifying and examining corals, it’s essential to handle your findings with care. Not only is this important for preserving the natural environment, but also for ensuring the integrity of your samples for further study or observation.
Cleaning and Storing Corals
After collecting coral specimens, their longevity can be directly related to how well you clean and store them. To maintain their natural state as much as possible, follow a meticulous cleaning process:
- Rinse corals with fresh water to remove any sand or salt particles.
- Use a soft brush to gently scrub away any lingering debris.
- Soak the specimens in a mild bleach solution if needed to remove algae or other organic matter—be mindful to dilute properly as strong chemicals can damage the coral.
- Rinse thoroughly with dechlorinated water to ensure all residual bleach is gone.
When it comes to storing corals, stability is key:
- Dry specimens slowly and in a well-ventilated area to prevent any disintegration from rapid moisture loss.
- Once dry, place corals in a dark, cool location to minimize any color fading due to light exposure.
- Label your containers with relevant data: collection date, GPS coordinates, and coral species.
- Avoid stacking or piling corals on top of each other to prevent accidental breakage.
Proper storage materials are also vital. Consider using:
- Acid-free tissue paper to wrap each piece individually.
- Sturdy containers with a secure lid to protect from dust and physical shocks.
- Silica gel packs in containers to combat humidity which can lead to mold growth.
By adhering to these guidelines, you’ll ensure that your corals remain in the best condition possible, retaining their value for research or educational purposes.
Conclusion: Confirming Coral is Real
You’ve now got the tools and knowledge to identify corals safely and sustainably.
Remembering to handle your finds with care will not only help protect marine ecosystems but also ensure that the corals you collect can be studied and appreciated for years to come. By cleaning and storing them correctly you’re taking an important step in preserving the beauty and integrity of these marine treasures. Whether you’re a budding marine biologist or a passionate snorkeler your efforts in coral identification are a valuable contribution to understanding and protecting our ocean’s biodiversity.
Keep exploring keep learning and most importantly keep respecting the delicate balance of our underwater world.